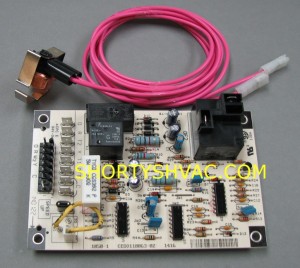
When changing the defrost circuit board it is a good idea to also change the defrost temperature sensor. The parts can be identified by providing the heat pump brand and model number. Always use the correct factory parts for this repair.
Make sure the power is disconnected for the outdoor unit as well as the inside air handler. The low voltage to the board is supplied from the transformer in the air handler and damage may result to the control system if control power is left on. Remove the old circuit board leaving the wiring intact. Install new defrost circuit board. Reconnect wires one at a time and reconnect on the same terminals for the new board. If there are any changes in the style of the board pay close attention to terminal markings and read any instructions provided.
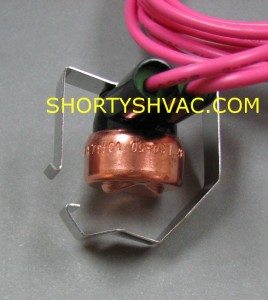
The defrost sensor is strapped on a lower copper connection on the outdoor coil near the small refrigerant line that goes towards the air handler. It has 2 wires that connect on 2 terminals of the defrost board. The strap around the copper line has an overlap retaining clip that holds the sensor on the copper. I have added a picture showing overlap retaining clip open. Remove the old sensor and install the new sensor. Disconnect old sensor from defrost board and reconnect new sensor.


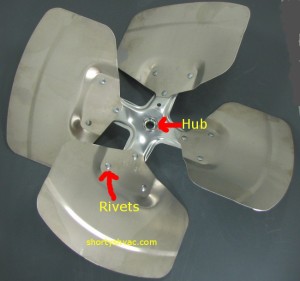
The condenser fan blade should be examined for signs of stress cracks. The most common place for the blade to develop stress cracks is around the rivets where the blades are attached to the hub. The blades are usually made out of aluminum and can flex during operation. If you see a hair line crack extending out from the rivet the blade should be replaced before the crack extends. The blade may flex and hit a bracket or copper line and can gouge a hole in the copper leading to a very expensive repair.
Another failure issue is the blade slipping on the hub. When this occurs sometimes the blade will make a high pitched whine during operation due to the blade turning slightly slower than the motor.
When you are replacing the fan blade make sure power has been disconnected from unit. Remove unit top and turn upside down for access to the blade. Remove lock screw in blade hub and soak hub with penetrating oil. Sand off any rust on the motor shaft. Hold the motor shaft between the fan blade hub and motor with a pair of pliers and gently rotate the blade on the shaft. Pull the hub away from the motor while rotating the blade on the shaft. When installing the new blade make sure the locking screw is tightened down on the flat spot on the shaft. this is very important.

Cleaning the condenser coil is very important maintenance. As the coil gets dirty you lose system efficiency which over works the unit and drives up operating cost as well as causing excessive wear. High operating temperatures can cause a breakdown of the compressor oil. Excessive high pressure can damage internal parts inside the compressor. Once the damage occurs it is a very expensive repair.
To clean the coil make sure all power is shut off to the unit including the 24 volt supplied from the air handler inside the building. Remove the fan assembly and wash the coil from the inside out with a garden hose. Do not use excessive pressure as this can damage the aluminum fins. We do not recommend using chemicals as some detergents will cause deterioration of the aluminum fins.
After washing out the coil re-assemble the unit and leave it off for 2-3 hours to give everything time to dry out before restarting the system.
Another easy do it yourself repair is replacing the run capacitor. The most common type of capacitor today is the round style dual capacitor. Capacitors are susceptible to damage from heat and we do see many failures related to high summer temperature as well as motor issues. When changing the capacitor you must choose the proper size. The capacitor is rated for the fan motor and the compressor. Fan motors are used with different compressor combinations so the motor alone can not be used to identify the correct capacitor.
The capacitor is located in the electrical compartment of the unit and is usually round and resembles a coke can with wire terminals on top.
To replace the capacitor make sure the power is off to the unit. Verify the power is off. the capacitor will have a strap holding it in place. Remove the screw and install the strap on the new capacitor and secure the screw. Note the color of the wire and carefully identify which terminal the wire is located on. The terminals will be labeled C HERM and F or FAN on the old and new capacitor. Remove the brown wire from the F or FAN terminal and install on the F or FAN terminal on the new capacitor. Remove the wire or wires from the HERM terminal of the old capacitor and install on the HERM terminal of the new capacitor. Remove the wire or wires from the C terminal of the old capacitor and install on the C terminal of the new capacitor.
The easiest way to replace a contactor for a do it yourself repair is to first make absolutely certain the power is turned off. Also make sure the air handler is shut off as the 24 volts to the contactor is powered from there. If the 24 volt circuit is left powered on you stand the chance of shorting out a control wire and burning out the 24 volt transformer. After you have verified all power is off remove the mounting screws and pull the old contactor out of the way without removing any wires if possible. If you must remove wiring make sure and mark the location the wire was connected to. Install the new contactor. Disconnect each wire and reconnect to the new contactor before removing the next wire. If you change one wire at a time you should not have any problems.
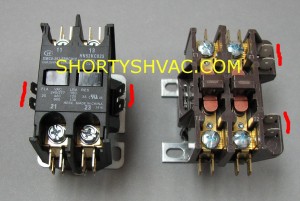
I have included a picture showing an old style contactor and a new style contactor. The new style has a dust cover over the contacts that is removable to inspect the contacts. The new style also has the 24 volt connections located on each side. The old style contactor does not have a dust cover over the contacts and the 24 volt connections are on the same side. I have drawn a red line beside the 24 volt connects for reference. The 24 volt connections are not polarity sensitive as the voltage is AC. It does not matter which connection the wires are placed on as long as both wires are not on the same connection.

Contactors can be purchased for do it yourself repairs from Shortys HVAC Supplies. If you are not sure of the correct part number please call or email us at parts@shortyshvac.com and we will be happy to identify the correct part for you.
Helping with Do It Yourself Funace and Air Conditioner Repairs


